When a table displays too many lines, you can improve its legibility by sorting or filtering the columns.
These functions are provided by Microsoft® .NET® technology.
Right-click a column header to display the contextual menu of table customization.
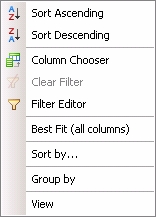
This function enables you to sort several columns by ascending or descending order.
To reorganize the tables lines according to the column contents, in alphabetical order and reverse alphabetical order, click once or twice on the corresponding column header to apply or modify the sort.
- The
 icon in the column header shows that this column was sorted by alphabetical order.
 - The
 icon in the column header shows that this column was sorted by reverse alphabetical order.
- Right-click in a column header. In the contextual menu, click the Sort by option.
The sorting dialog box opens up.
- Specify the columns to sort and the sorting order.
The column first specified is the first to be sorted, and so on.
- Click the following buttons, as needed:
- Clear all to delete the sorting settings in the dialog box,
- Cancel to cancel the sort and go back to the table,
- OK to validate the settings and go back to the table.
The table is sorted according to the validated settings.
This function enables you to sort the lines by grouping them by value in one or several columns.
- Right-click in a column header. In the contextual menu, click the Group by option.
The group by value dialog box opens up.
- Specify the columns to sort and the sorting order.
The column first specified is the first to be sorted, and so on.
- At the bottom of the dialog box, enable the Full Expand option to display an expanded view of each value group, or disable this option to display a reduced view of each value group.
- Click the following buttons, as needed:
- Clear all to delete the sorting settings in the dialog box,
- Cancel to cancel the sort and go back to the table,
- OK to validate the settings and go back to the table.
The table appears in the form of a tree structure with the value groups.
Click + and - in front of the lines group to expand or collapse it.
To filter the lines on the values of a column, place the cursor on the corresponding column header.
The  icon appears in the column header.
Click this icon to access the corresponding contextual menu and select one of the options described below.
| Option | Description |
|---|---|
| Custom | Select this option to customize a filter. When you click this option, the dialog box of filter customization opens up, and you can enter there the filtering criteria on the alphanumerical content of the column cells. 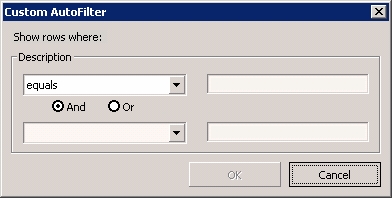 The dropdown list on the left enables you to select the search option, and its field on the right enables you to enter the string to search for. The And and Or option buttons enable you to add a second filtering criterion. |
| Blanks | Select this option to view only the lines for which a value is entered in this column. |
| Non Blanks | Select this option to view only the lines for which no value is entered in this column. |
| Other values | Select a value to view only the lines with the specified value in this column. |
- Right-click in a column header. In the contextual menu, click the Filter Editor option.
The dialog box of the Filter Editor opens up and you can enter the filtering criteria.
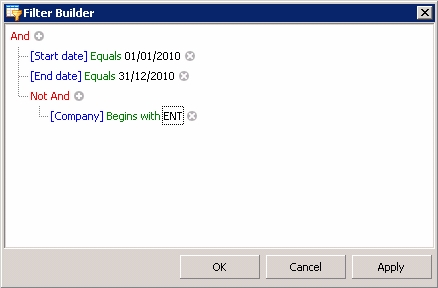
The filter expression consisting of conditions groups, is displayed.
Each conditions group contains:
- A logical (or boolean) operator (AND, OR, etc.), displayed in red,
- conditions (one per line), containing:
- the name, in blue, for the column related to the condition,
- a comparison condition (Equal, Greater than, etc.) in green,
- values in black.
- To add a condition to the group, click + in front of the operator.
To delete a condition from the group, click x in front of the condition.
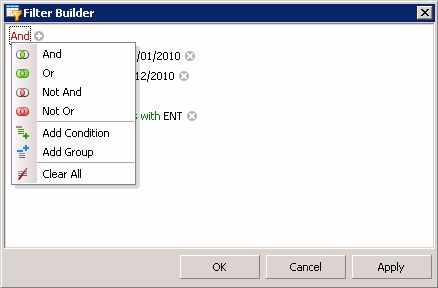
- Click an operator or a column name to view the corresponding contextual menu.
| Option | Description |
|---|---|
| AND | Logical operator: logical AND This operator enables you to check that both conditions are met. |
| OR | Logical operator: logical and non-exclusive OR This operator enables you to check that at least one of the two conditions is met. |
| NOT AND | Logical operator: NOT (condition_1 AND condition_2) This operator enables you to check the opposite of the logical AND. |
| NOT OR | Logical operator: NEITHER condition_1 NOR condition_2 This operator enables you to check the opposite of the logical OR. |
| Add Condition | This option enables you to add a condition to the selected group. The new condition depends on the same logical operator as the other conditions of the group. |
| Add Group | This option enables you to add a group of conditions based on a logical operator that you need to select. |
| Remove Group | This option enables you to delete the selected group of conditions. (this option is not displayed for the root group) |
| Clear all | This option enables you to delete the whole filter. It is only displayed for the root group of conditions. |
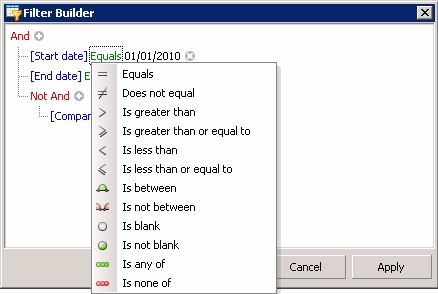
| Option | Search String | Syntax |
|---|---|---|
| Equals | Exact value to check | Equals value |
| Does not equal | Exact value to exclude | Does not equal value |
| Is greater than | Value strictly greater than | Is greater than value |
| Is greater than or equal to | Value greater than or equal to | Is greater than or equal to value |
| Is less than | Value strictly less than | Is less than value |
| Is less than or equal to | Value less than or equal to | Is less than or equal to value |
| Is between | Value included in the specified value range with a floor and a ceiling (both excluded from the value range) | Between value_1 and value_2 |
| Is not between | Value not included in the specified value range with a floor and a ceiling (both included in the value range to exclude) | Is not between value_1 and value_2 |
| Is blank | Value left blank | Is blank |
| Is not blank | Value entered | Is not blank |
| Is any of | Value included in the specified list Click the + sign to add a value to the list. |
ANY (value_1, value_2, value_3) |
| Is none of | Value not included in the specified list Click the + sign to add a value to the list. |
Is none of (value_1, value_2, value_3) |
The values in the contextual menu of the column depend on the columns displayed in the table.
- Click the following buttons, as needed:
- OK to apply the filter and go back to the table,
- Apply to apply the filter without closing the dialog box,
- Cancel to cancel the filtering settings and go back to the table.
In the table, right-click on a column header and, in the contextual menu, select the Clear filter option.
This function enables you to automatically adapt the width of each column according to its content.
Right-click in a column header. In the contextual menu, click the Best Fit (all columns) option.
The width is adapted.
This function enables you to modify the display order of the columns by dragging and dropping.
- Click in the column header and drag it while keeping the mouse button pressed, and move the cursor where you want the column to be.
- Release the mouse button.
The column is moved.
You can choose the columns to display in a table, as well as their display order.
Two functions enables you to do this:
- Column Chooser, to select columns by drag-and-drop,
- View, to select the columns from a list.
- Right-click in a column header. In the contextual menu, click the Column Chooser option.
The Customization dialog box appears specifying the names of the hidden column headers.
- To hide a column, click its header, and drag and drop the column in the Customization dialog box.
- To view a column, click its header in the Cutomization dialog box, and drag and drop the column where you want it to be.
- To change the display order of the table columns , click a column header in the table and drag and drop it where you want the column to be.
- Click the following buttons, as needed:
- Cancel to cancel the configuration and go back to the table,
- OK to validate the settings and go back to the table.
The table appears with the selected columns.
- Right-click in a column header. In the contextual menu, click the View option.
The customization dialog box opens up.
- Specify the columns to show and those to hide with the Add and Remove buttons.
Remember that the columns will be displayed in your selection's order.
- Click the following buttons, as needed:
- Cancel to cancel the configuration and go back to the table,
- OK to validate the settings and go back to the table.
The table appears with the selected columns.